The Rebel Gallofree transport's landing gear dug into the dirt as the vessel's repulsorlifts shut down, the gear then taking the full weight of the ship. To the rear an airlock hissed and as the pressure levels equalised the doors slid open, a boarding ramp lowered itself to the floor just as the first of the Rebel troops double timing it out of the ship reached the end. His boots crunched as they hit the dirt of the dusty streets, he stood off to one side as the steady stream of troops behind him continued to march off the transport. Scanning the area of the outskirts of the town he could see a billowing black column of smoke, the site where their sister ship had gone down. Heading there to search for any survivors was their first priority. He then looked up at the foreboding hill that overlooked the city, topped with an Imperial garrison bristling with heavy turbolaser batteries. That would be their next objective, and a crucial one at that. If they couldn't get up that hill and take out that Imperial installation? They'd be going nowhere.
ROUND 1: TATOOINE: BESTINE
In a bid to rescue a crashed Rebel transport shot down by Imperial Turbolasers, a Rebel strike team took on the challenging task of assaulting the Imperial capital on Tatooine, the city of Bestine. The Rebel forces quickly secured the crash site of that transport and moved further into the city, overrunning the Imperial forces at the foot of the hill with relative ease. The hill itself however was a different story. With the advantage of the high ground Imperial forces dug in and rained down death from above upon the invaders. The fighting was fierce with the Rebel forces relentlessly inching their way up the hill despite the vicious onslaught of the Imperial artillery, but in the end they could not overcome the conditions of the battlefield and were wiped out despite fighting valiantly down to the last man.
ROUND 2: BANDOMEER: REFINERY ASSAULT
On the hunt for valuable resources to aid in the war effort, Rebel forces attacked the Imperial held refinery on the remote world of Bandomeer. With heavy air support in the form of X-Wing Fighters and stolen Imperial Lambda shuttles, the Rebels raided the installation, rapidly deploying troops via their stolen shuttles, and gaining armoured support from Freerunner APCs and T1-B tanks. The Imperials however were quick to mobilize in defence of the valuable installation, deploying TIE Interceptors and Bombers, and a number of tanks from the nearby Imperial garrison. The Rebels managed to gain a beach head at the refinery, but were never able to consolidate their position enough to move forward, and finally the Imperial defences proved too strong, with the Rebel forces having to cut their losses and withdraw.
ROUND 3: BATTLE OF TALORAAN
The Imperial Navy has sent another battle group to the Taloraan system with the aim of destroying the Rebel space forces that have taken hold of the system and return the valuable resources of the planet into Imperial hands. The Rebel fleet was ready for them and sent in wave after wave of starfighters to soften up the capital ships as they approached the defending fleet. The Imperials charged forward with the aim of scattering the Rebel fleet, but the Rebels held fast, and in a tight formation were able to bring to bear their whole fleet's combined firepower on the approaching fleet, taking out the Imperial forces heaviest cruiser first and then mopping up the rest. The Rebel fleet only lost their support ship in this engagement, and once again the Imperial space forces were vanquished.
The Empire is victorious once more, with the Rebel Alliance troops unable to break the impressive Imperial defences. The Imperial Navy however are still having problems dealing with the Alliance's tough starfighters, and space superiority is something that the Empire can ill afford to lose. The battles will continue until one faction finally has dominion over the entire Galaxy, but for whom shall you fight? Join the fun and sign up at:
Registration for the campaign remains open with more players joining every week, so it is still not too late to take part. Whether it's helping the Alliance to Restore the Republic, or maintaining the order of the First Galactic Empire, choose your side and stand shoulder to shoulder with First Strike veterans and newcomers alike.
Next week is the final round of battles in this campaign. To make things a little more interesting the points gained in the grand final will be multiplied meaning that it is still all to play for. In addition there will be a voting poll to decide on the space map that people would most like to play for this final. An extended 16 player round of Bestine with higher tickets for a longer game will be the infantry map, while Jundland Wastes 64 will be the land map, but the space map is still to be decided on, So check the NIC forums for details on how to vote for your favourite map to be played in next week's grand finale.
General Gwynzer turned away from the mountainous landscape and stepped back into the control room. Passing his officers he headed straight for the command console and studied the sensor readout display. His sentries had just reported in having spotted a number of unidentified transports landing in the prairies beyond the foothills far below. It had to be the Rebels. This sensor tracking station was not yet operational, but clearly the Rebels had something in this sector that they wanted to stay hidden. Even so, this was a bold move. The facility wasn't as well defended as an Imperial Garrison, High Command didn't consider this station that valuable a target, but it was still fairly well fortified, with this only augmented by it's position high up in the mountains. There were only a few routes up to the installation, and he'd be ready for them.
A technician turns to his commanding officer to report that they've lost contact with the service tower. It has begun.
ROUND 1: NULL SENSOR STATION
Having landed Gallofree transports on the remote moon of Null, an advance Rebel strike team managed to infiltrate the Imperial mountain top installation via a poorly guarded service tower. However when out on top of the mesa it was a different story, with the Imperial forces putting up a highly organised and devastating defence of the base. Almost makes you wonder if the poorly guarded service tower wasn't a trap. Taking advantage of the high ground that the base afforded them, the Imperial troops rained down death from the roof tops and guard towers. In the end the onslaught was too much for the Rebel infantry to take and they were forced to withdraw.
ROUND 2: NULL SENSOR STATION
Having failed to succeed with an infantry based attack, the Rebel General Angelus initiated the second phase of his operation, deploying armour up the treacherous mountain pass. He had hoped to avoid this route as the Empire would have the advantageous high ground, but he had no choice. After the initial attack the Empire were waiting, deploying troops and armour to key strategic points along the pass. Firehawkes and light AT-ST Walkers unleashed a punishing barrage on the incoming enemy tanks, lining the mountain trail with the burning debris of vanquished Rebel armour, but the Rebel forces were relentless and eventually broke through the lines and captured the checkpoint. However it was too little too late, and the combined fire that rained down from the base and the remaining Imperial armour decimated what remained of the Rebel attack group, and once again they were forced to retreat.
ROUND 3: IMPERIAL CONVOY RAID
Suffering a number of hit and fade attacks from Rebel space forces, Imperial High Command had assigned a squadron of the new Hyperspace jump capable TIE Defenders to a crucial convoy en route to the Outer Rim. As suspected a Rebel force jumped in to intercept the convoy, and the TIE Defenders were waiting for them. The new advanced Imperial ships proved highly effective against the Rebel fighters, and managed to make the Rebel forces pay a heavy price for their attack. However thanks to their solid experience with hit and fade tactics, enough of the hardy Rebel fighters managed to make it through to their targets, and just when the Imperial pilots thought that they might just be successful in defending their wards, the convoy of freighters blossomed in a fiery display behind them. Not the best debut then, for the Empire's latest fighter.
So once again the Empire strikes a crushing blow to the Rebellion, inflicting heavy loses on their troops and denying them victory on the ground. However the Rebel Alliance also showed that even against the Empire's most advanced starfighters, the Rebels can still achieve space superiority thanks to their tough ships and veteran pilots.
The battles will continue until one faction finally has dominion over the entire Galaxy, but for whom shall you fight? Join the fun and sign up at:
Registration for the campaign remains open with more players joining every week, so it is not too late to take part. Whether it's helping the Alliance to Restore the Republic, or maintaining the order of the First Galactic Empire, choose your side and stand shoulder to shoulder with First Strike veterans and newcomers alike.
For a taste of what you're missing, check out Campaign Member Joshino's excellent video footage from last week's games. Enjoy.
Finally in other news, the campaign event will be taking a break next weekend. Despite not having a game next Sunday, we encourage people to get on at about the same time on Saturday and Sunday for the Community Games. The Official Campaign matches will return the weekend after, that being July 24th. Where the action will take place on Tatooine in the Imperial held city of Bestine, the remote refinery on the planet Bandomeer, and will finally take to space in a space map as chosen by the campaign community.
Enjoy the weekend off and prepare to come back fresh as the battle continues on July 24th.
To give you a guys a break from the NIC Campaign battle reports, we thought it was high time we gave you another development related news update.
The first half of the year has proven quite busy for the majority of the development team members of First Strike, resulting in a quite slow level of progress up to this point, but with the Summer comes additional dev team members who have been away, and the opportunity to really get stuck in and get some work done. So our aim is to really chip away at the remaining tasks on Hoth and finally bring this complex map to fruition.
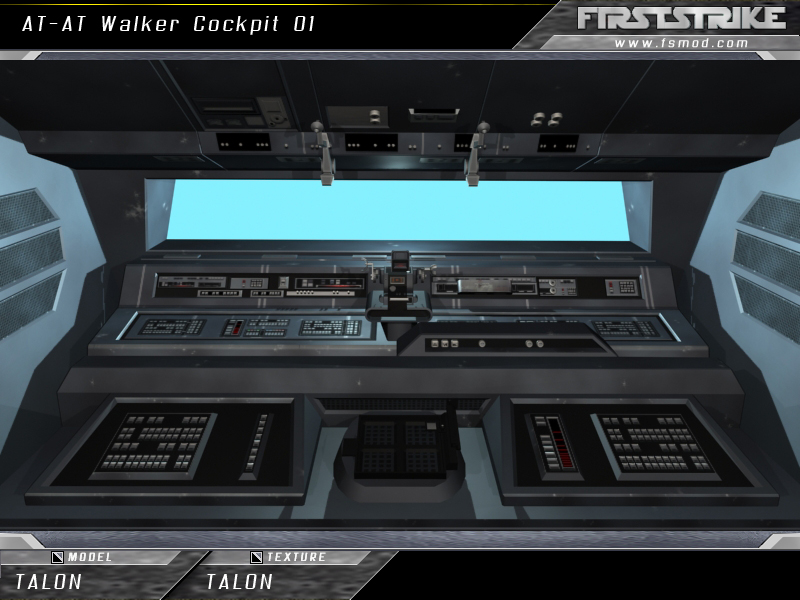
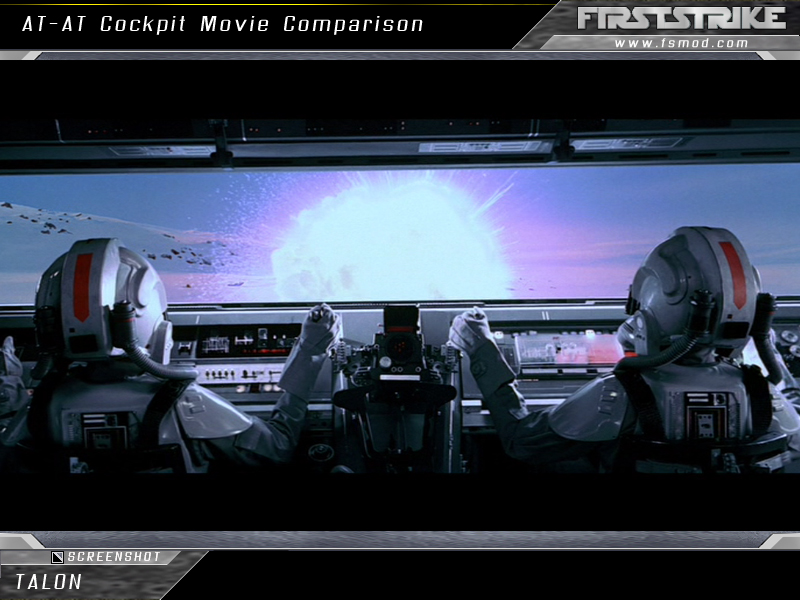
One of the key if not essential elements that needs to be perfected for any Battle of Hoth map are of course the iconic AT-AT Walkers, and progress continues in this area. We are really looking forward to showing you these bad boys fully functional and in game. They are in there, but additional polish is needed such as perfecting the walk animation, developing the weapons they will make use of, and of course coming up with a solution for the classic Snowspeeder vs. AT-AT takedown. All exciting things that will help bring us one step closer to releasing an incomparable Battle of Hoth experience.
With today's update we'd like to reveal to you the finalised interior of the AT-AT Walker cockpit, and the view you'll be treated to as the Walker commander. Attention to detail as always has been key, and we have endeavoured to produce the best in game representation of this environment. Other interior elements will include a crew bay in which Imperial Snowtroopers can await deployment before zip-lining to the icy tundra below. This is an exciting time as we charge ever closer (like a stomping Imperial Walker) towards our goal, that being the release of the best possible Battle of Hoth experience we can deliver to you.
The last two images will allow a side by side comparison between our model and the movie version.
Enjoy.
Finally, we are always on the look out for new talent who may wish to aid us in our pursuit of the perfect Star Wars gaming experience. If you feel you have talent and suitable experience in modelling, texturing or coding we'd be happy to talk to you about a position on the First Strike Development Team. Just follow the link and fill out the form provided:
Dust settles over the once sleepy town of Mos Entha, the settlement now broken and burning in the cold Tatooine night. There is a dull thud as explosive bolts are released and an emergency hatch falls to the desert floor from the hull of the downed Rebel Blockade Runner. The Captain of the vessel had valiantly piloted his ship all the way down and managed to achieve a reasonably survivable crash landing. He was gone, the command deck devastated on impact, but there were survivors. The Commander of the ship's trooper detachment drops down to the ground below followed by his team of Naval Fleet troopers. They just had to hold out long enough for a rescue boat to come in and lift them off this dust ball. Imperial forces would have had to have spotted them going down in this area. Their troops would also be on the way.
The Commander lifts a pair of macrobinoculars and surveys the immediate area around them. He spots moonlight glinting off something shiny, and then the night sky is alive with a storm of red hot light.
ROUND 1: ENCOUNTER AT MOS ENTHA
This was always going to be a tricky encounter for the Rebel Alliance troops involved, crashing behind enemy lines, with a battle still raging in space above, the odds were against them from the start. They set up a solid defence around the wreckage of their downed capital ship, but Imperial forces arrived before Rebel reinforcements could. Once overrun the Rebels attempted to secure other areas within the town to hold out against the elite Imperial Sandtroopers which had been deployed against them, but to no avail. The Rebels in this conflict were completely wiped out.
ROUND 2: BATTLE OF RYLOTH
Having discovered a hidden Rebel base on the inhospitable outer rim world of Ryloth, the Imperial Fleet dispatched a Star Destroyer to bombard the site from orbit. Forces were then deployed to the surface to mop up any survivors. They however gravely underestimated the defences of the Rebel base, and found that base to be still largely intact with an impressive array of armour and aircraft to throw at the invading Imperial forces. This miscalculation resulted in a devastating blow to the Empire. With their troops overwhelmed and forced into an unprecedented retreat. This day belonged to the Alliance.
ROUND 3: BATTLE OF TALORAAN
With two fleets encountering each other over the resource rich world of Taloraan the stage was set for an epic space battle. As the Imperial fleet moved in to engage, the Rebel fleet commander took advantage of turbulent gravity sheers found being so close to a gas giant. Finding a calm pocket in this veritable storm of gravitational waves he held back, forcing the Imperial fleet to come to him through the storm. This resulted in their fighters being mostly ineffective, and cruisers unable to manoeuvre to peak efficiency. The gambit paid off and the Rebel fleet easily decimated the advancing Imperial forces. Not the most honourable of victories, but a much needed victory non-the-less.
So at last we have an overwhelming victory for the Rebel Alliance. The seemingly insurmountable foe that are the military forces of the Galactic Empire have shown that they can be beaten. But has the tide turned, or was this just an anomaly, a bump on the road towards complete galactic domination? Either way this week has shown that the Rebel Alliance are still in this fight.
As we reach the halfway mark of this campaign event it is still all to play for. To the victor? Total domination of the Galaxy. So what are you waiting for? Sign up and join the fun at:
Registration for the campaign remains open with more players joining every week, so it is not too late to take part. Whether it's helping the Alliance to Restore the Republic, or maintaining the order of the First Galactic Empire, choose your side and stand shoulder to shoulder with First Strike veterans and newcomers alike.
In additional news, the address of the Nations In Conflict website has changed, this new address is now in the link above. Also from now on the match events will commence at 20:00 GMT, this works out as an hour later than the matches in previous weeks.
The next round starts this Sunday and will be played over Null Sensor Station. An exciting map with a good mix of vehicle and infantry action, should be interesting. Followed by the space map Imperial Convoy Raid.